dc – Double Crochet
sk – Skip
sps – Space(s)
pm – Place Marker
rep – Repeat
Skill Level: Easy
🌸 Instructions:
Round 1 (Color A):
Start with a magic ring (or ch4, sl st to the first ch to form a circle).
ch3 (counts as dc), pm in the 3rd ch if needed.
Work 15 dc into ring.
Join with a sl st to the 3rd ch. (16 dc sts)
Round 2 (Color A):
ch4 (counts as dc + ch1), pm in the 3rd ch,
[1 dc, ch1] in every st around.
Join with a sl st to the 3rd ch. Fasten off Color A. (16 dc + ch1 sps)
Round 3 (Color B):
Join Color B in any dc st.
ch3 (counts as dc), pm in 3rd ch, 2 dc in next ch1 sp,
[1 dc in dc, 2 dc in ch1 sp] repeat around.
Join with sl st to 3rd ch. (48 sts)
Round 4 (Color B):
ch1, sc in same st, pm on first sc,
[ch5, sl st to 5th ch, sk 2 sts, sc in next st, ch2, sk 2 sts, sc in next st, ch3, sk 2 sts**, sc in next st, ch2, sk 2 sts, sc in next st].
Repeat from [ ] around, ending last repeat at **.
Join with sl st to first sc.
Round 5 (Color B):
Sl st into next ch5 sp,
ch3 (counts as dc), pm in 3rd ch,
[4 dc, ch3, 5 dc] in same ch5 sp,
sc in ch2 sp, 5 dc in ch3 sp, sc in ch2 sp*
[5 dc, ch3, 5 dc] in next ch5 sp.
Repeat from * around, ending last repeat at **.
Join with sl st to 3rd ch. Fasten off Color B.
Round 6 (Color C):
Join to any ch3 corner sp.
ch1, [sc, ch3, sc] in same ch3 sp, pm on first sc,
ch5, dc in next sc, ch3, sk 2 dc, sc in next dc, ch3, sk 2 dc, dc in next sc, ch5*
[sc, ch3, sc] in next ch3 sp.
Repeat from * around, ending at **.
Join with sl st to first sc.
Round 7 (Color C):
Sl st into next ch3 sp,
ch3 (counts as dc), pm in 3rd ch,
[2 dc, ch2, 2 dc] in same ch3 sp,
5 dc in ch5 sp, 3 dc in each of next two ch3 sps,
5 dc in ch5 sp*
[3 dc, ch2, 3 dc] in next ch3 sp.
Repeat from * around, ending last repeat at **.
Join with sl st to 3rd ch.
Round 8 (Color C):
ch1, sc in each st around (place marker in first sc),
working [2 sc, ch2, 2 sc] in each corner ch2 sp.
Join with sl st to first sc.
Round 9 (Color C):
ch1, sc in each st around (pm in first sc),
working 3 sc in each corner ch2 sp.
Join with sl st to first sc.

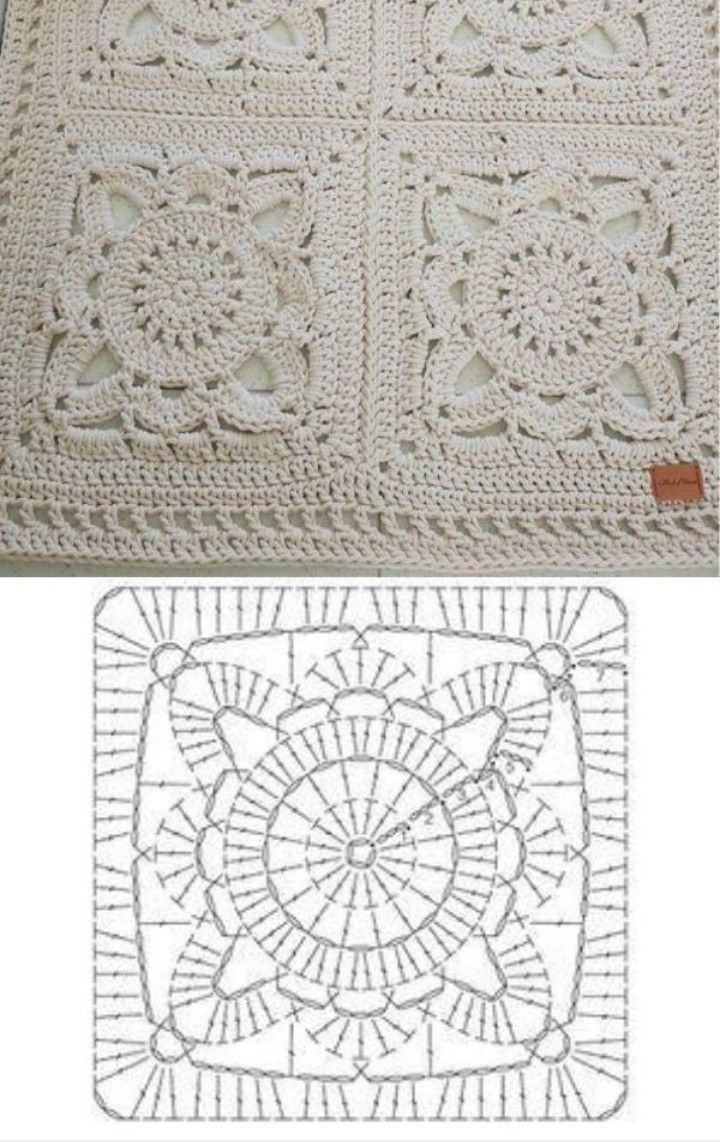
Diagram
✨ Finishing Touches:
Once you’ve completed your desired number of Willow Granny Squares, weave in any loose ends using a yarn needle and block your squares to shape them nicely.
Now comes the fun part – assembling! Stitch your squares together using your preferred joining method. These versatile motifs can be turned into:
Cozy afghans
Beautiful pillow covers
Decorative wall hangings
Bags and totes
And more!
Let your imagination guide you and have fun creating something truly unique.
Ready to try this pattern?
Start hooking today and share your creations with fellow crocheters! The Willow Granny Square is not just a pattern – it’s a gateway to endless crochet inspiration.