Happy Improv Tote Pattern

Written byAdmin in

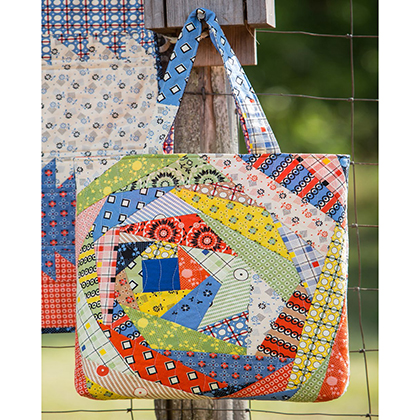
Hello, fellow quilting enthusiasts! At My Sweet Crochet, we’re always on the lookout for exciting and inspiring projects to elevate your crafting experience. Today, we’re thrilled to introduce the Happy Improv Tote patternโ€”a delightful journey into the world of improvisational quilting. Get ready to embrace your creativity, break free from the constraints of traditional patterns, and embark on a whimsical adventure with the Happy Improv Tote.

Improv quilting is all about spontaneity and self-expression, and the Happy Improv Tote pattern is the perfect project to let your creativity run wild. Say goodbye to meticulous planning and embrace the joy of making decisions on the fly. Whether you’re a seasoned quilter or just starting, this pattern is designed to make the process enjoyable and stress-free.

Key Details:

Skill Level: Experienced Beginner
Finished Size: 11ยฝโ€ x 13ยฝโ€ x 4โ€ (29.21cm x 34.29cm x 10.16cm), excluding handles
Let your creative spirit shine as you dive into this project that seamlessly marries form and function. The Stonington collection lends its unique charm to the improvisational piecing, resulting in a tote that’s not only visually appealing but also a joy to create. Perfect for those with a bit of sewing experience, this tote offers a weekend of crafting pleasure.

Happy Improv Tote Pattern

Happy Improv Tote Pattern

Fabric Requirements:

  • (A) (1) 21โ„2โ€ (6.35cm) Stonington Design Roll (40 pieces)
  • (B) 1โ„2 yard (22.86cm) coordinating Designer Essentials Solids fabric of your choice for lining

Additional Requirements:

  • Coordinating and Contrasting Coatsยฎ Dual Duty XP all-purpose thread
  • (2) 17โ€ (43.18cm) squares batting
  • (2) 17โ€ (43.18cm) squares muslin
  • 1โ„8 yard (11.43cm) medium- to heavyweight fuse interfacing, 45โ€ (114.30cm)
  • Rotary cutter/mat/ruler
  • Sewing machine
  • Basic sewing and pressing supplies

Cutting:

  • Fabric B, cut: (2) 16โ€ (40.64cm) squares for lining
  • Fuse interfacing, cut: (2) 21โ„2โ€ x 21โ€ (6.35cm x 53.34cm)

Design Note: Improv piecing offers the freedom to explore without rigid patterns. Feel free to follow the provided tote photo or create your own unique patterning. A single pieced block is used for both the tote front and back.

Sewing:

Note: Seam allowances are 1โ„4โ€ (.64cm) unless otherwise noted. Sew pieces right sides together.

  1. Begin the improv block by cutting a shape (square, hexagon, octagon, or triangle) from the scraps of Fabric B.
  2. Sew a 21โ„2โ€ (6.35cm) Fabric A strip to one side of the shape, press the strip open, and trim the ends at an angle.
  3. Continue adding assorted Fabric A strips until the pieced block reaches 161โ„2โ€ (41.91cm) square. Keep the initial solid shape off-center for visual appeal. Trim the block edges to square.
  4. Make a second block following Steps 1-3.

Tote Assembly:

  1. Layer muslin, batting, and quilt block (right side up) and quilt as desired.
  2. Repeat for the second block.
  3. Trim blocks to 16โ€ (40.64cm) square.
  4. With right sides together, sew blocks along the sides and bottom edges.
  5. To box corners, fold the lower corners, align side seam with bottom seam, draw a perpendicular line 11โ„2โ€ (3.81cm) down from the point, stitch on the line, and trim the corner to a 1โ„2โ€ (1.27cm) seam. Repeat for the opposite corner.

Handle Assembly:

  1. Piece together leftover 21โ„2โ€ (6.35cm) Fabric A strips to create (4) 21โ„2โ€ x 21โ€ (6.35cm x 53.34cm) handle strips.
  2. Fuse interfacing to two pieced strips following the manufacturer’s instructions.
  3. Sew long edges of one interfaced handle strip to an uninterfaced strip with a 1โ„2โ€ (1.27cm) seam allowance. Turn right side out, press, and edgestitch both long edges. Repeat for the second handle.

Lining Assembly:

  1. Repeat Steps 9-10 with the 16โ€ (40.64cm) Fabric B lining squares, leaving a 4โ€ (10.16cm) opening in the bottom for turning.
  2. Pin the outer handle edges 4โ€ (10.16cm) from tote front side seams and baste in place. Repeat for the tote back.
  3. With right sides together and matching side seams, place the tote inside the lining with handles tucked between. Sew around the upper edge.

Finishing:

  1. Turn the tote right side out through the lining opening and press.
  2. Turn under the edges of the lining opening and stitch closed.
  3. Tuck the lining into the tote, extend the handles, and edgestitch around the top.

Dear craftsman, did you like this tutorial and want to access the PDF? You can access the PDF made by Denyse Schmidt here below:

Access the PDF/ Happy Improv Tote Pattern

Congratulations! You’ve just created your own Happy Improv Tote, a beautiful testament to the joy of quilting and the freedom of improvisation. Happy crafting!

You Are Here:

We use cookies to offer you the best experience on our website. By continuing to browse, you confirm that you accept these terms.